Features:
Characteristics
- The minimum division value reaches 0.2μm, high in precision, can drive 4-grade block gauges.
- It can be used for the verification of high-precision plain plug gauges, thread plug gauges and precision sphere diameters.
- It is equipped with various worktables, convenient for replacement, in accordance with parts of different shapes.
Usages:
Technical parameters:
- Range of measurement: 0-180mm
- Minimum graduation: 0.2μm
- Range of index plate: ±100 graduations
- Indication error
- ±(0.05+?L/400) μm, in which ?L means the range of comparative
- Indication stability: 0.02μm
- Measurement force:1.20N±0.2N
- Size of working table
- Seven-grooved worktable: used for verification of thick block gauges and workpieces
- Spherical grooved worktable: used for verification of thin block gauges and workpieces
- Plane worktable: used for measurement of sphere diameters
- Moving bracket of block gauge: used for laying and moving the standard and the measured block gauges.
- Overall sizes of the instrument (mm): 320×230×820
- Mainframe weight: 30 kg
Features:
- JT5Aφ800 digital measuring projector
- JT5Bφ800 data processing projector
- JT5Eφ800 full-auto projector
- Characteristics :
- The in-line type is adopted for the objective, cone fitted, compressed by spring, accurate in central location.
- It is equipped with circular worktable which can be turned around in all directions, convenient for measuring gear parts
- The deflection of worktable can be ±15°, convenient for measuring shaft-like helical parts;
- Advanced raster measurement technology and data processing system of full and complete function can achieve high efficiency with small error;
- Worktable of large travel range is adopted, having strong load capacity.
- JT5A adopts advanced raster sensor technology to measure data and digital display and the motor controlling the movement of worktable
- JT5B is equipped with computer and two-coordinate measurement software, achieving convenient and fast measurement and the motor controlling the movement of worktable.
- JT5E, the full-auto projector, providing the motor for full-auto control of the movement, has rich functions of its software, including automatic edge- tracing system.
- Horizontal light-path is adopted, convenient for the measurement of the measured parts processed online.
Usages:
Technical Parameters
- Projection screen
- Projection screen: φ800 mm
- Rotation range :360°
- Rotation division value of projection screen: 1°
- Resolution of the rotary angle: 1′
- Worktable:
- Worktable area: 630mm×200mm
- Measuring range
- Longitudinal direction: 300mm
- Vertical direction: 200mm
- Transverse direction: 80mm
- Resolution: 0.001mm
- Rotation: ±15°
- Accuracy of the instrument: (4+L/50)μm, of which, L=length of the workpiece measured (unit: mm)
- load capacity of the worktable: 50kg
- Tailstock rack
- Maximum diameter gripped: φ200mm
- Maximum length gripped : 300mm
- Lighting source
- Transmission lighting: 24V 250W Halogen tungsten lamp
- Reflecting lighting: 16V 150W Incandescent lamp
Objective
| Objective Magnification Power |
10X |
20X |
50X |
100X |
| Object Visual Field (mm) |
φ80 |
φ40 |
φ16 |
φ8 |
| Object Working Distance (mm) |
206 |
123.5 |
85 |
78 |
Overall sizes of the instrument (mm):2130×1800×1950
Mainframe weight: 1900kg
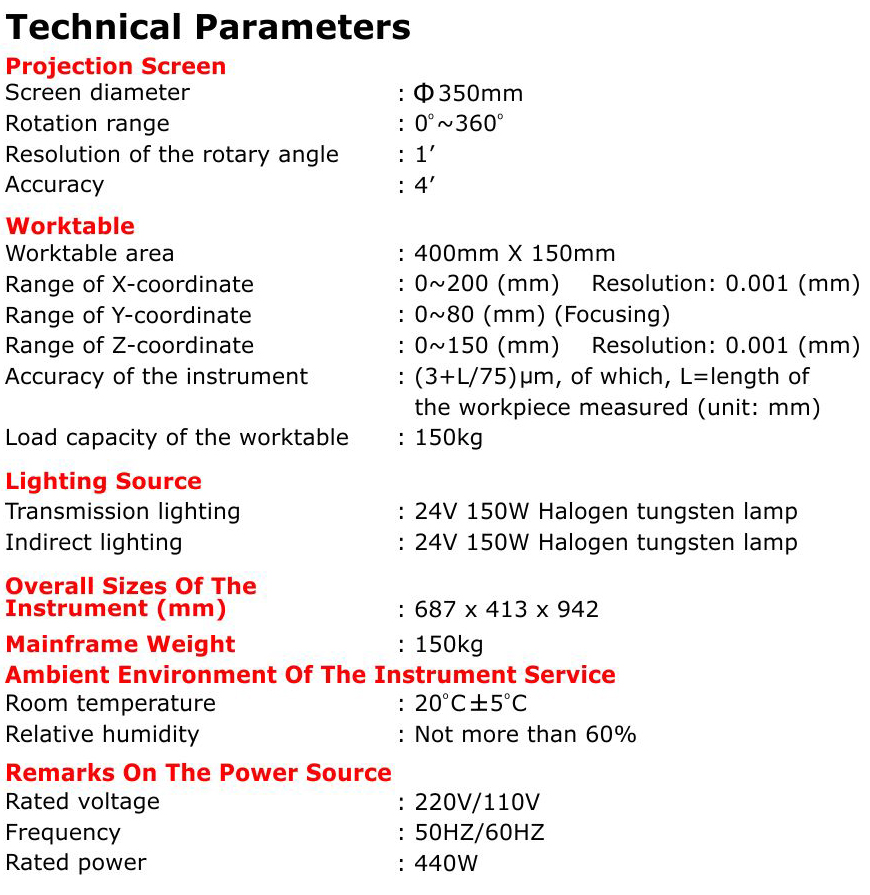
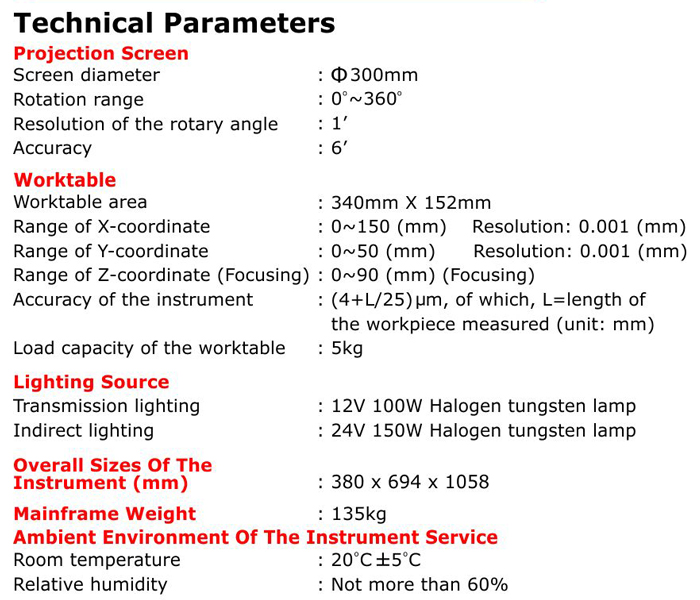
Techinical Parameters
Projection Screen
- Screen Diameter: φ350mm
- Rotation Range: 00~3600
- Resolution of the rotary angle: 1′
- Accuracy: 4′
Workable
- Worktable Worktable area : 400mm X 150mm
- Range of X-coordinate : 0~200 (mm) Resolution: 0.001 (mm)
- Range of Y-coordinate : 0~80 (mm) (Foucusing)
- Range of Y-coordinate : 0~150 (mm) Resolution: 0.001 (mm)
- Accuracy of the instrument: (3+L/75)µm, of which L=Length of the workpiece measured (unit:mm)
- Load capacity of the worktable: 15kg
Lighting Source
- Transmission lighting: 24V 150W Halogen tungsten lamp
- Indirect lighting: 24V 150W Halogen tungsten lamp
Overall Sizes of the insrument(mm): 687 X 413 X 942
Mainframe Weight: 150kg
Ambient Environment of the Insrument Service
- Room temperature: 200C±50C
- Relative Humidity: Not more than 60%
Remarks on the Power source
- Rated Voltage: 220V/110V
- Frequency: 50HZ/60HZ
- Rated Power: 440W
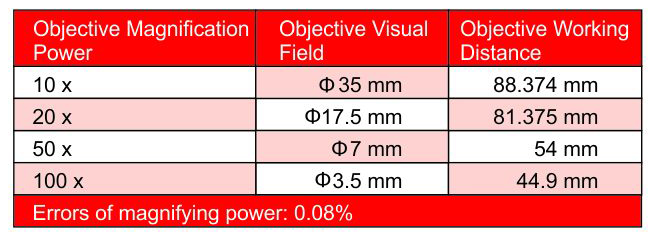
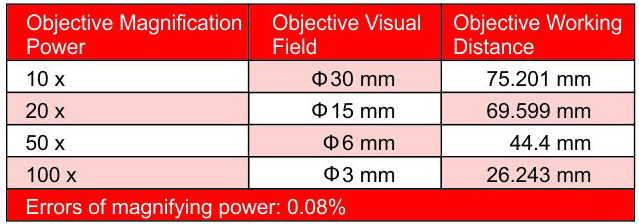
| Objective Magnification Power |
Objective Visual Field |
Objective Working Distance |
| 10 x |
φ35 mm |
88.374 mm |
| 20 x |
φ17.5 mm |
81.375 mm |
| 50 x |
φ7 mm |
54 mm |
| 100 x |
φ3.5 mm |
44.9 mm |
| Errors of magnifying power: 0.08% |
Features:
- JX11B Digital Universal Toolmaker’s Microscope
- JX13B Computer Universal Toolmaker’s Microscope
- Characteristics
- JX11B The precision grating scale as the measuring element makes it convenient for measurement with digital display
- JX11B Equipped with digital readout and micro-printer, it is convenient for the measurement data output
- JX11B With multiple eyepieces and objectives, the main microscope has a large scope of view field with clear image formation;
- JX13B Taking the precision grating scale as the measuring element, the collection point coordinate can use computer to conduct the data processing
- JX13B With powerful software, it can complete various complicated measurements.
- JX13B Software data can be input to CAD for processing, enabling the efficient and fast completion of various measurements and drawings.
Usages:
Technical parameters:
Worktable
- Range of measurement
- X-coordinate: 200mm
- Y-coordinate: 100mm
- Resolution: X- and Y-coordinate measurement: 0.0002mm
- Accuracy of the X- and Y-coordinate: (1+L/100)μm, of which, L = length of the measured workpiece, unit: mm
- Area of square worktable (mm): 260×270
Objective
| Objective magnification |
Total magnification |
Object working distance (mm) |
Object visual field (mm) |
| 1× |
10× |
≈79 |
≈20 |
| 3× |
30× |
≈69 |
≈6.7 |
| 5× |
50× |
≈49 |
≈4 |
- Angle tilting range: ±12°
- Tailstock
- Maximum diameter gripped by the tailstock: φ100 mm
- Maximum length gripped by the tailstock: 700 mm
- Overall size:1300×1250×800
- Weight: 450kg
Features:
- JX14B Digital Large Scale Toolmaker’s Microscope
- JX14B1 Digital Large Scale Toolmaker’s Microscope
Characteristics
- JX14BThe photoelectrical technique is adopted, with a precision grating rule as a measurer for X- and Y-axle as a measurer, with readings direct-viewing and testing convenient.
- JX14B1The photoelectrical technique is adopted, with a precision grating rule as a measuring element for X- and Y-axle and a numbering device as a measuring element for the rotary worktable, to realize the length and angle full-display; with readings direct-viewing and testing convenient.
- With multiple eyepieces and objectives, the main microscope has a large scope of view field with clear image formation.
- The main microscope can oscillate left and right, suitable for the measurement for spiral parts.
- LED-illuminating lighting is adopted for transmission and reflecting illumination, with low heating power and long life.
- High-speed and micro-motion devices are adopted, which can be switched over quickly.
- The tailstock rack is installed to measure the axel-type parts.
- Multiple accessories are provided, with extensive uses.
Technical Parameters
Worktable
- Range of measurement
- X-coordinate: 150mm Y-coordinate: 75mm
- Resolution ratio: X- and Y-coordinate measurement 0.001mm
- Accuracy of the instrument: (2+L/50)μm, of which, L = measured length ( unit: mm)
- Diameter of the circular worktable:
- Φ190mm(glass) Φ280mm(metal)
- Angle tilting range : ±12°
- Tailstock
- Maximum clamping diameter: Φ70mm
- Maximum clamping length: 190mm
| Objective magnification |
Gross magnifying powe |
Object working distance (mm) |
Object visual field (mm) |
| 1× |
10× |
79 |
Φ20 |
| 3× |
30× |
69 |
Φ6.7 |
| 5× |
50× |
49 |
Φ4 |
Overall sizes : 720×460×600
Weight: 100 kg
Features:
- High-quality cast iron base is taken by nature time process for a long time. Therefore it has good rigidity and stability;
- It adopts the air floating method, therefore, its operation is flexible and portable and it has no abrasion and small noise;
- Equipped with the temperature transducer, it can real time display the temperatures of instrument and workpiece and automatically complete the real time compensation of temperature error;
- The complete measuring accessories with wide range can meet different measuring demands;
- The grating measuring system with high precision has the characteristics of reliable stability , low heating power, corrosion resistant and pollution resistance, which also has higher measuring precision;
- The main measuring axis adopts optimum square design so as to ensure the moving stability;
- Absolute measurement and comparison measurement for the external dimension. Measurements for the internal dimension, hole and thread;
- Real time hint the operating step: it has the function for automatically find reversal point and operation is very convenient;
- Input the coordinate point by keyboard: Relative data can be outputted to AutoCAD WORD so as to process data or print data;
Usages:
Applying range:
Its mainly uses is used to directly measure the checking length bars of the external micrometers, internal micrometers and length bars made by yourself. It can also measure the internal dimensions of catch plates, through-holes and blind holes and the pitch diameter of external thread.
The serial air flotation grating length measuring machine can carry out the comparison and absolute measurements of internal and external dimensions of various parts. It is suitable for using in the inspecting departments and laboratory of machine building, tool making, in the manufacture of gauges and measuring instruments.


