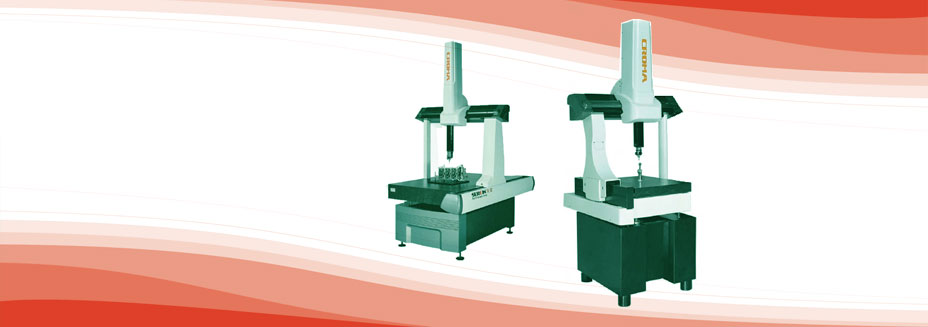
Croma 454 CMM

Main Features

  • Cross beam and Axis Z are made of surface-anodized aerometal with superior temperature consistency, reducing the mass of the moving parts and the inertia motion of measuring machine running at high speeds.
  • High-precision self-cleaning air bearing is used for permanently wear-resistant guideways of all the three axes for more steady operation.
  • Patented TESA high-precision optical scale is used for all the three axes.
  • Each motion axes are driven by DC servo motor. Ensure steady and accurate motion.
  • Precise triangular beam patented technology is applied to axis X, featuring lower center of gravity, better mass-rigidity ratio and more reliable motion relative to rectangular and cross beams.
  • Patented pneumatic counterbalance (adjustable) for Z axis combined solves interference between axial movement and transmission system and enhances accuracy and long term stability with flexible suspension system, improves measuring machine’s stability and rigidity.
  • IDC-I control system specially designedy by HEXAGOON for Croma improves the dynamic performance and measuring accuracy
  • Powerful, easy-to-learn and efficient PC-DMIS BASIC (/PC-FMIS PREMIUM) software

Machine Types   Croma 454
Strokes (mm) X 440
Y 490
Z 390
Overall Size (mm) L 1162
W 1032
H 2318
Platform (mm) X 559
Y 750
Z 483
Capacity (kg)   227
Machine Weight (kg)   345
MPEe (µm)   2.8 + L/300
MPEp (µm)   3.5
Raster Resolution (µm)   0.078
Max. 3D Speed (mm/s)   520
Max.3D Acceleration (mm/s)   1730
Air Pressure   100 Nl/min, 0.45 Mpa
Temperature   20±2°C
Humidity   45%-75%

Croma Coordinate Measuring Machines

Main features

  • All aluminium structure combined with hard amodized aerometal for cross beam and Z axis ensures temperature consistency, reduces mass of moving parts and force of inertia, hence ensures high accuracy during high speed movementHigh-precision self-cleaning air bearing in all three axes, smoother movement without wearing down guide ways
  • Europe-imported high-precision optical scales for all the three axes, system resolution up to 0.078um; installation method with one end fixed and the other end freely extensible ensures linear expansion and contraction at temperature change and reduces the deformation of the optical scale.
  • The patented precision triangular beam, featuring gravity center, better stiffness, and more reliable motion compared to rectangular and cross beams.
  • Integral dovetail guideway is Y axis, reduces machine weight as well as twistings during movement, ensures measuring accuracy and stability
  • All axes driven by DC servo motors for stable movement and accurate locations
  • The IDC-I control system specially designed by HEXA or CROMA improves the dynamic performance and measuring accuracy
  • Powerful, easy-to-learn and efficient PC-DMIS BASIC (/PC-DMIS PREMIUM) software
Machine Types   Croma 584 Croma 686 Croma 8106 Croma8126
Strokes (mm) x 500 600 800 600
y 600 800 1000 1200
z 400 600 600 600
Measuring Range (mm) Dx 634 734 934 934
Dz 144 144 144 144
Dz1 594 794 794 794
Working Plate (mm) Ph 783 783 805 805
Py 1155 1355 1555 1755
Support (mm) Sy 824 976 1178 1378
Sy1 356 379 379 379
Overall Size (mm) Lx 1050 1150 1350 1350
Ly 1535 1735 1935 2135
Lz 2247 2647 2729 2729
Max. Part Weight (kg)   300 300 500 500
Machine Weight (kg)   590 739 1074 1196
MPEe (µm)   2.8 + L/300 2.8 + L/300 3.0 + L/300 3.0 + L/300
MPEp (µm)   3.5 3.5 3.5 4
Scales Resolution (µm)   0.078
Max. 3D Speed (mm/s)   520
Max.3D Acceleration (mm/s)   1730
Air Pressure   120 Nl/min, 0.45 Mpa
Temperature   20±2°C
Humidity   45%-75%

Function Plus

Main features

  • “L” shape movable bridge, with 3 same height columns supporting Y axis groove guideway, while left column, cross beam, carriage and saddle work together as the moving bridge. Better mobility and less abbe error improve CMM’s accuracy and repeatability.
  • X and Z beam adopt the ultra-rigid precise aerometal
  • Y beam adopts precise integrated granite guideway
  • Pneumatic counterbalance (adjustable) for Z axis, together with flexible suspension system, which make Z axis operate stably. This structure is the best solutioin to the interference between axial motion and rive system and improves measuring machine’s stability and rigidity.
  • All machine axes’ transmission mode is timing belt, whose compact, non-skid structure makes it has excellence of high stability and accurate positioning.
  • High-precision self-cleaning air bearing is used for the permanently wear-resistant guideways of all the three axes for more steady operation
  • All machine axes are equipped with the scales (gold and steel) of German Heidenhain which are certified by PTB (Physikalisch-Technische Bundesanstalt), a German national institute of science and technology. Europe-imported high-precision optical scale are used for all the three axes, system resolution up to 0.078um; Installation method with one end fixed and the other end freely extensible reduces the deformation of the optical scale.
  • Remote mounted drive motors reduce moving mass for faster setting, and dissipate heat away from the machine frame
  • Equipped with the powerful measuring software which second to none, Inspector can handle any common shop measurement and inspection tasks
  • Powerful, easy-to-learn and efficient PC-DMIS BASIC (/PC-DMIS PREMIUM) software
Function Plus Model   10158 10218 10308 122110 123010 152110 153010 152112 153012
Strokes (mm) x 1000 1000 1000 1200 1200 1500 1500 1500 1500
y 1500 2100 3000 2100 3000 2100 3000 2100 3000
z 800 800 800 1000 1000 1000 1000 1200 1200
Measuring Range (mm) Dx 1364 1364 1364 1564 1564 1864 1864 1864 1864
Dz 151 151 151 151 151 151 151 151 151
Dz1 951 951 951 1151 1151 1151 1151 1351 1351
Platform (mm) Ph 400 400 400 400 400 400 400 400 400
Py 2000 2600 3600 2600 3500 2600 3500 2600 3500
Propping (mm) Sy1 400 400 400 400 400 400 400 400 400
Sy2 1200 1800 2700 1800 2700 1800 2700 1800 2700
Sx 1300 1300 1300 1500 1500 1800 1800 1800 1800
Overall Size (mm) L 2725 3326 4226 3326 4226 3326 4226 33264 4226
W 1780 1780 1780 1980 1980 2280 2280 2280 2280
H 3422 3422 3422 3622 3622 3622 3622 3822 3822
Capacity (kg)   1300 1800 2000 3000 3500 3000 3500 3000 3500
Machine Weight (kg)   5500 6500 9500 7600 11000 8600 13000 8800 13200
MPEe (µm)   3.1 + L/300 3.5 + L/300 4.0 + L/300 5.0 + L/300
MPEp (µm)   3.3 3.7 4.2 5.2
Raster Resolution (µm)   0.078
Space Speed (mm/s)   433
Space Acceleration (mm/s)   1039
Air Pressure   2.5 dm3/s (150 Nl/min), >0.7 Mpa
Temperature   20±2°C
Humidity   45%-75%